
B+ Tree
Introduction to B+ Tree
A B+ Tree is a special type of self-balancing multi-way search tree. It is mainly used for storing and searching a very large amount of data. Unlike a Binary Search Tree, a B+ Tree can have many children for a single node.
The most important feature of a B+ Tree is that the actual data records are stored only in the leaf nodes. The internal nodes contain only index keys. These keys help us to find the correct leaf node quickly.
Another important feature is that all leaf nodes are connected with each other using links. Because of this linking, a B+ Tree is very efficient when we want to search a range of values.
Why Do We Need a B+ Tree?
Suppose a database contains millions of student records. If we want to search for one particular student, we should not have to check every record one by one. A B+ Tree creates an index structure that helps us reach the required data very quickly.
For example, suppose the database contains the following student roll numbers:
Instead of searching all these values sequentially, a B+ Tree divides them into smaller groups. The internal nodes guide the search and the leaf nodes contain the actual values.
Basic Structure of a B+ Tree
A B+ Tree mainly consists of two types of nodes:
- Internal Nodes
- Leaf Nodes
1. Internal Nodes
Internal nodes contain index keys. They do not contain the actual data records. Their main purpose is to guide the search towards the correct leaf node.
For example, consider the following internal node:
Here, 20 and 40 are index keys. They divide the search space into three parts:
Therefore, the internal node helps us decide which child node should be followed.
2. Leaf Nodes
Leaf nodes contain the actual data records or data keys. All leaf nodes are present at the same level.
For example:
Notice the arrows between the leaf nodes. These links allow us to move from one leaf node to the next leaf node without going back to the root.
Simple B+ Tree Example
Let us understand the basic structure using a small example. Suppose we have the following keys:
A simple B+ Tree may look like this:
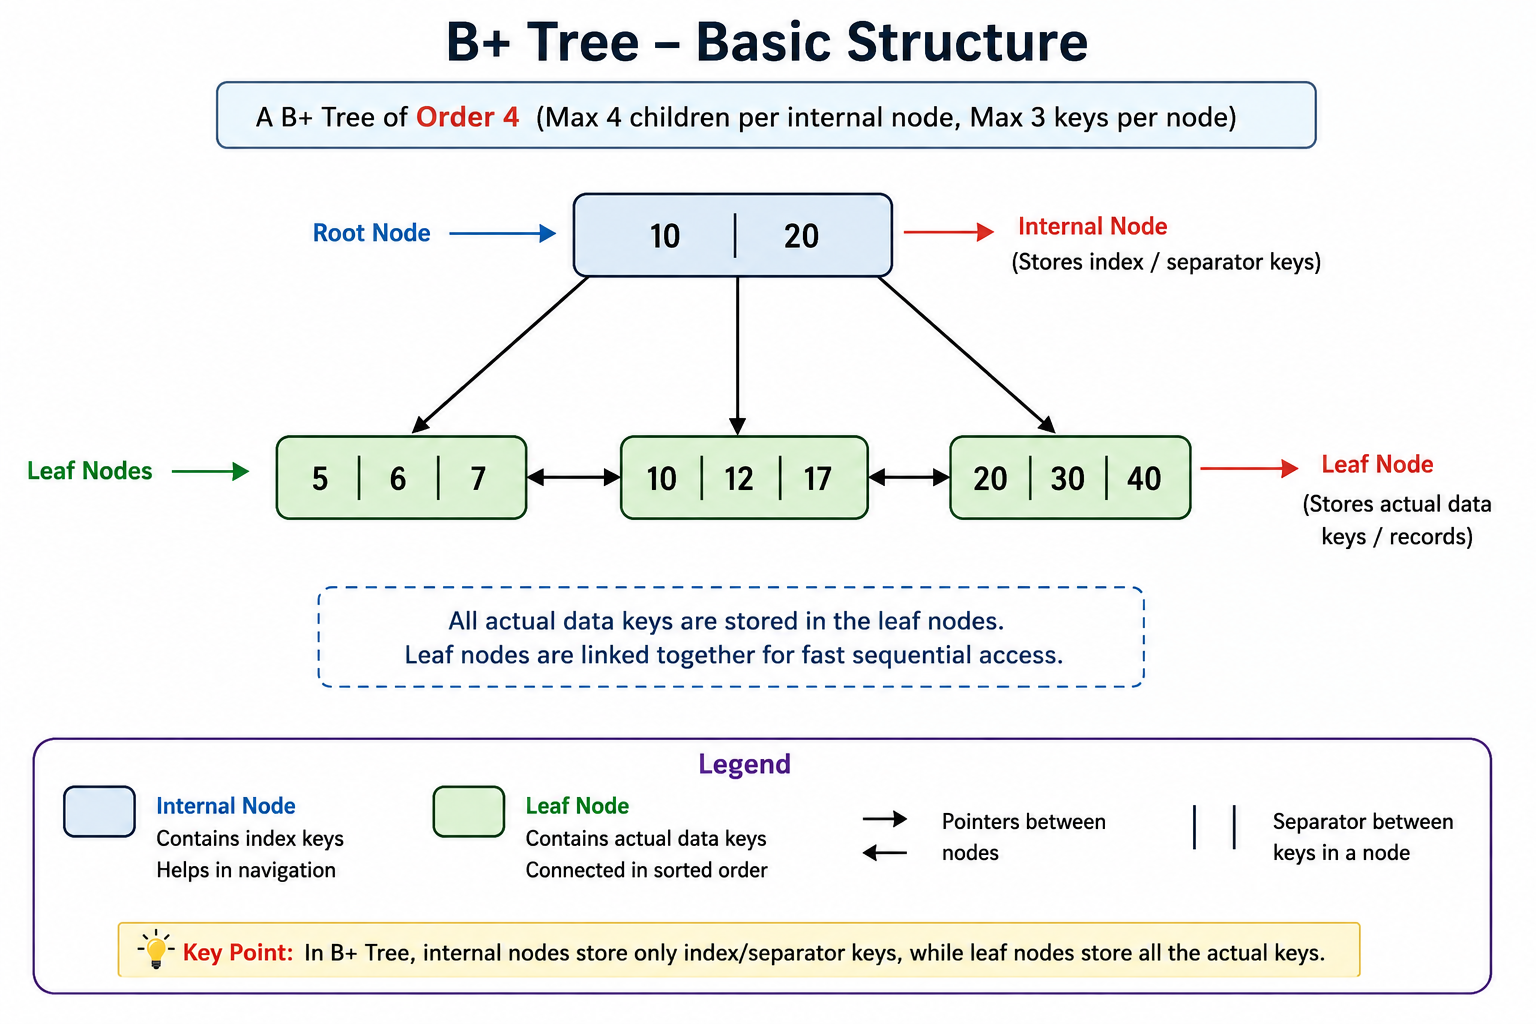
Figure 1: Basic Structure of a B+ Tree
The important thing to notice is that the values in the leaf nodes are connected.
This linked structure is one of the biggest advantages of a B+ Tree.
Important Parts of a B+ Tree
| Part | Purpose |
|---|---|
| Root Node | Starting point of the tree. |
| Internal Nodes | Contain index keys and guide the search. |
| Leaf Nodes | Contain the actual data keys or records. |
| Leaf Links | Connect one leaf node to the next leaf node. |
Important Properties of B+ Tree
| Property | Explanation |
|---|---|
| Balanced | All leaf nodes remain at the same level. |
| Multi-way | A node can have more than two children. |
| Internal Nodes | Store index keys used for searching. |
| Leaf Nodes | Store all actual data keys or records. |
| Linked Leaves | Leaf nodes are connected using pointers. |
| Fast Searching | Searching requires only a small number of node visits. |
| Fast Range Queries | Linked leaves make sequential range searching efficient. |
B+ Tree and B-Tree
Students often confuse a B+ Tree with a B-Tree. Both are balanced multi-way search trees, but there is an important difference in where the actual data is stored.
| B+ Tree | B-Tree |
|---|---|
| Actual records are stored in leaf nodes. | Records may be stored in internal as well as leaf nodes. |
| Internal nodes mainly contain index keys. | Internal nodes can contain data records. |
| Leaf nodes are linked. | Leaf nodes are generally not linked in the same way. |
| Very efficient for range queries. | Range traversal is comparatively less convenient. |
| Widely used for database indexing. | Used in many indexing and storage applications. |
Why Are Leaf Nodes Linked?
This is one of the most important questions related to B+ Trees.
Suppose we want to find all values between 20 and 40. First, we search for the starting value 20. Once we reach the leaf node containing 20, we can simply follow the links to the next leaf nodes.
We can therefore read:
There is no need to return to the root after every value. Therefore, linked leaf nodes make range searching very efficient.
Order of a B+ Tree
The term order is very important when constructing a B+ Tree. The exact interpretation of order can vary slightly between textbooks, so while solving a problem we should always follow the definition given in that question.
For our examples in this tutorial, we will use a simple convention:
This convention will make our insertion and deletion examples easy to understand.
How Does a B+ Tree Remain Balanced?
A B+ Tree automatically maintains its balanced structure. Whenever a node becomes too large, it is split into smaller nodes.
During deletion, if a node does not contain enough keys, the tree may use:
- Borrowing a key from a neighbouring node.
- Merging two nodes.
These operations ensure that all leaf nodes remain at the same level.
What We Will Learn Next
Now that we understand the basic structure of a B+ Tree, let us learn how a B+ Tree is actually constructed.
In the next section, we will take a set of keys and insert them one by one. We will see exactly what happens when a leaf node becomes full and how the node is split.
Creating a B+ Tree Step by Step
Now let us learn how a B+ Tree is created. The easiest way to understand a B+ Tree is to insert the keys one by one and observe what happens after every insertion.
For our example, we will construct a B+ Tree of Order 4.
Remember:
- All actual keys are stored in the leaf nodes.
- Keys inside a leaf node are kept in sorted order.
- When a leaf node becomes full and another key has to be inserted, the node is split.
- A separator key is copied to the parent.
- The key remains in the leaf because the actual data is stored at the leaf level.
- Leaf nodes remain connected with links.
Step 1: Insert 10
Initially, the B+ Tree is empty. We insert the first key:
Since there is no tree yet, a new leaf node is created.
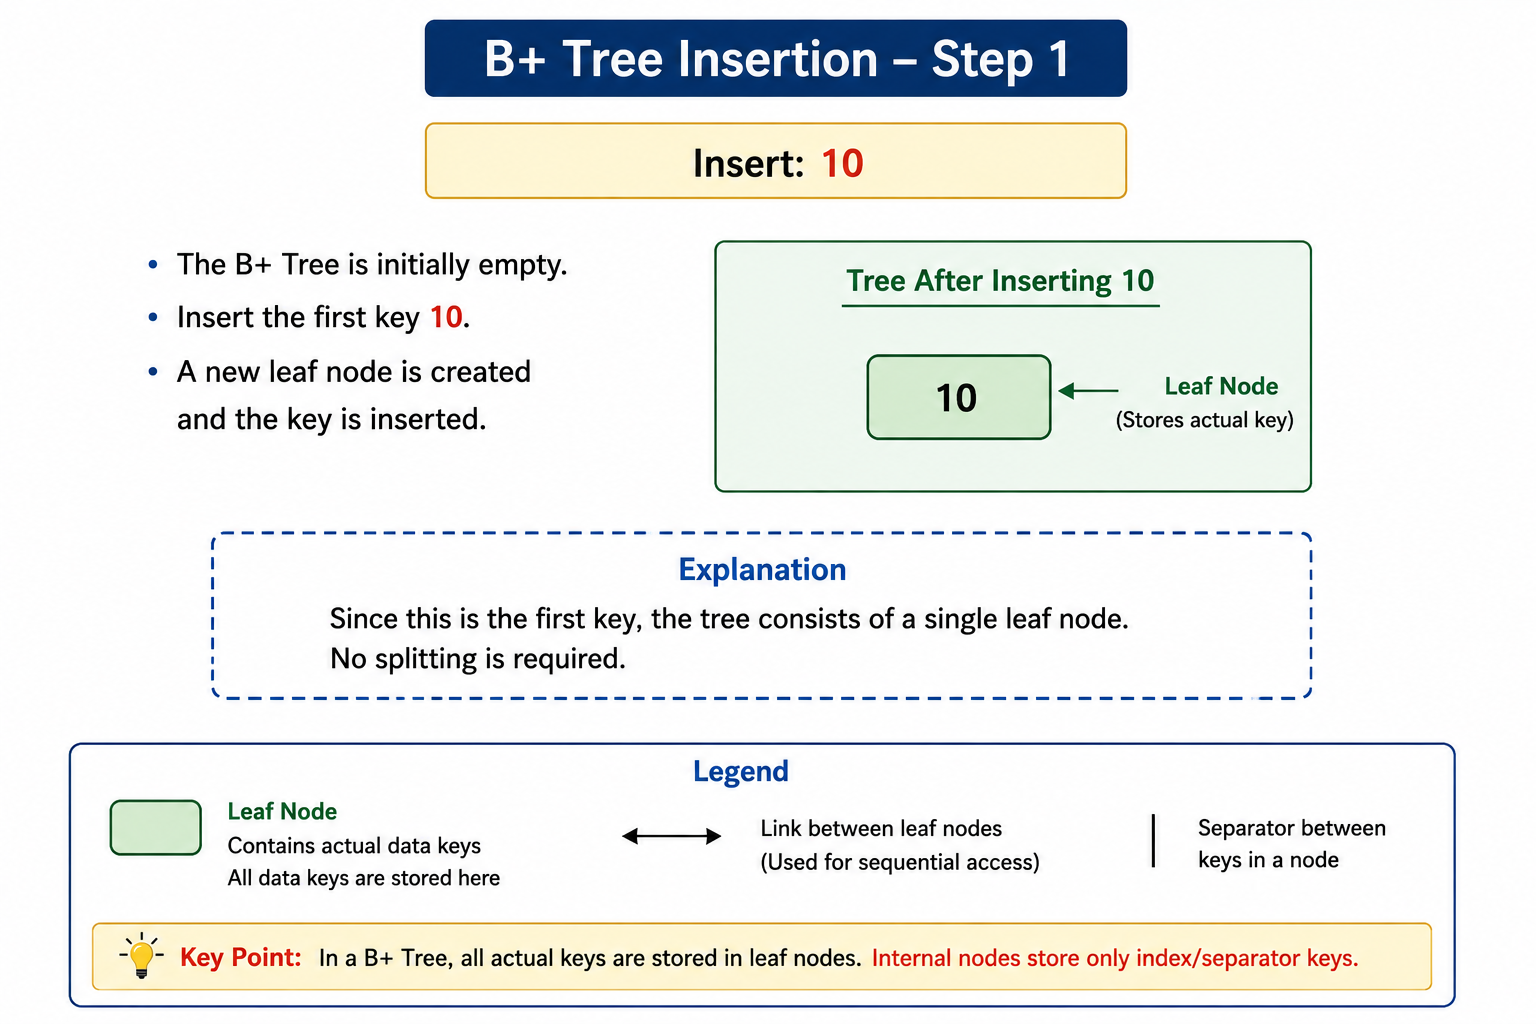
Figure 2: B+ Tree after inserting 10
The tree contains only one leaf node. No splitting is required.
Step 2: Insert 20
Now insert:
The key 20 is inserted into the existing leaf node. We always keep the keys in sorted order.
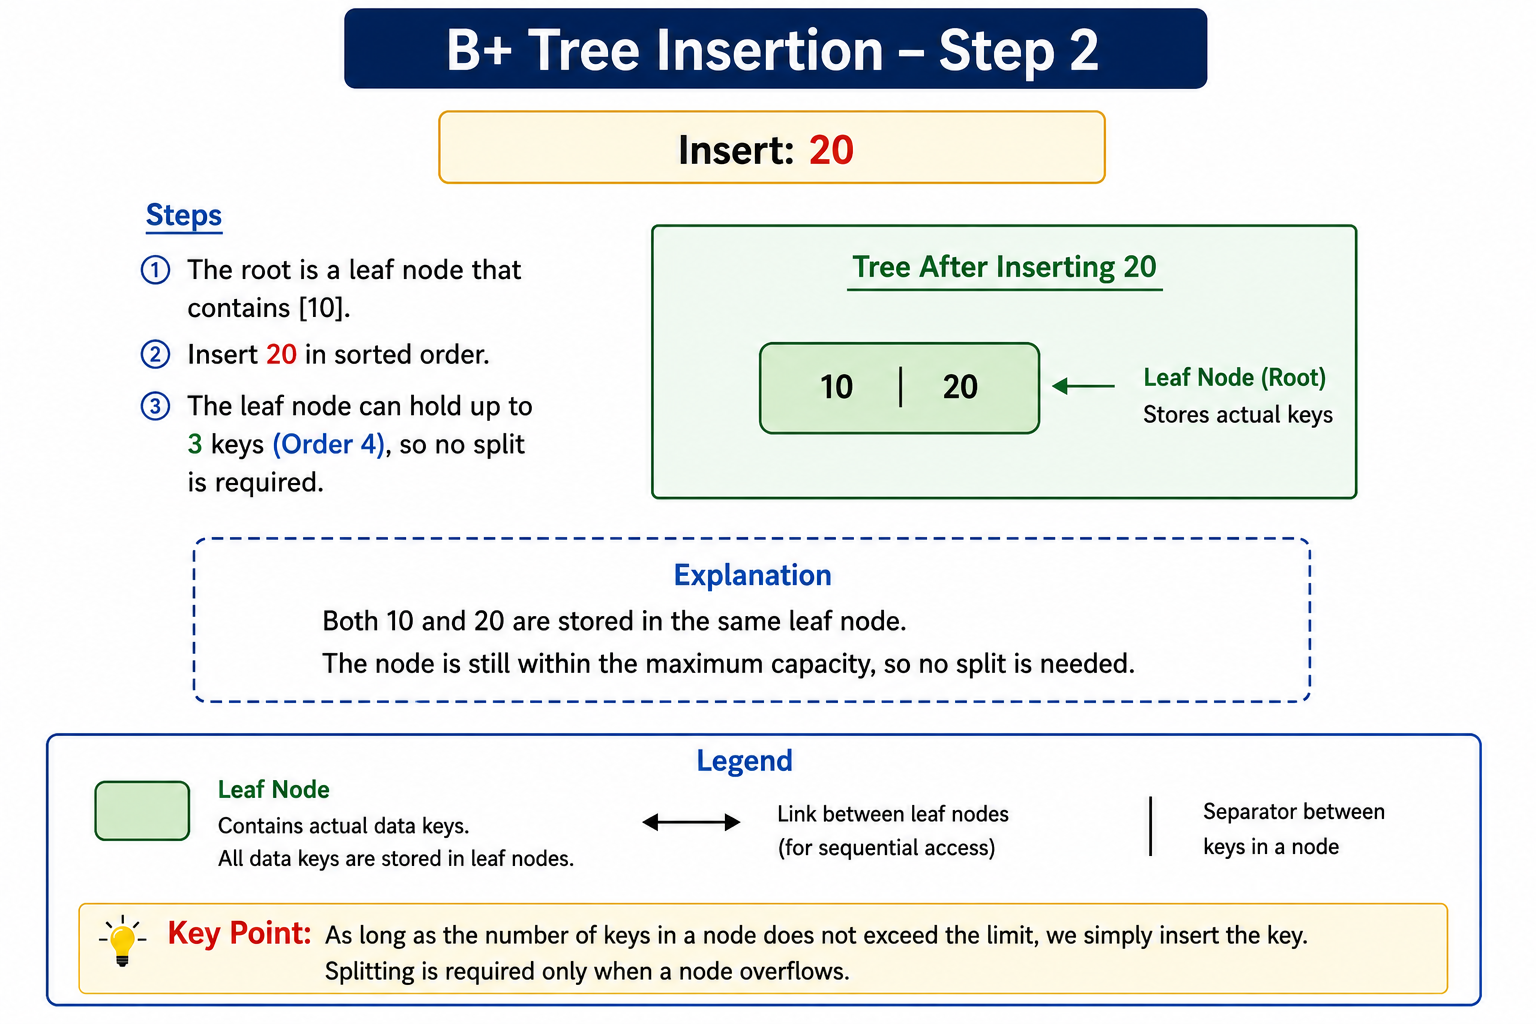
The leaf node still has space. Therefore, no splitting is required.
Step 3: Insert 5
Now insert:
The key 5 is smaller than 10. Therefore, it is inserted before 10.
The node now contains three keys. For an Order 4 B+ Tree, this is still within our maximum of three keys in a leaf. Therefore, the node does not split yet.
Step 4: Insert 6 — First Overflow
Now we insert:
First, insert 6 in sorted order. The temporary leaf becomes:
There are now 4 keys in the leaf. Our maximum is 3 keys. Therefore, the node has overflowed.
What should we do?
We split the leaf node into two leaf nodes. A simple way to divide the keys is:
The first leaf contains:
5, 6
The second leaf contains:
10, 20
The first key of the second leaf, 10, is copied to the parent as the separator key.
Notice an important point: 10 remains in the leaf node. We only copy it to the parent as an index key.
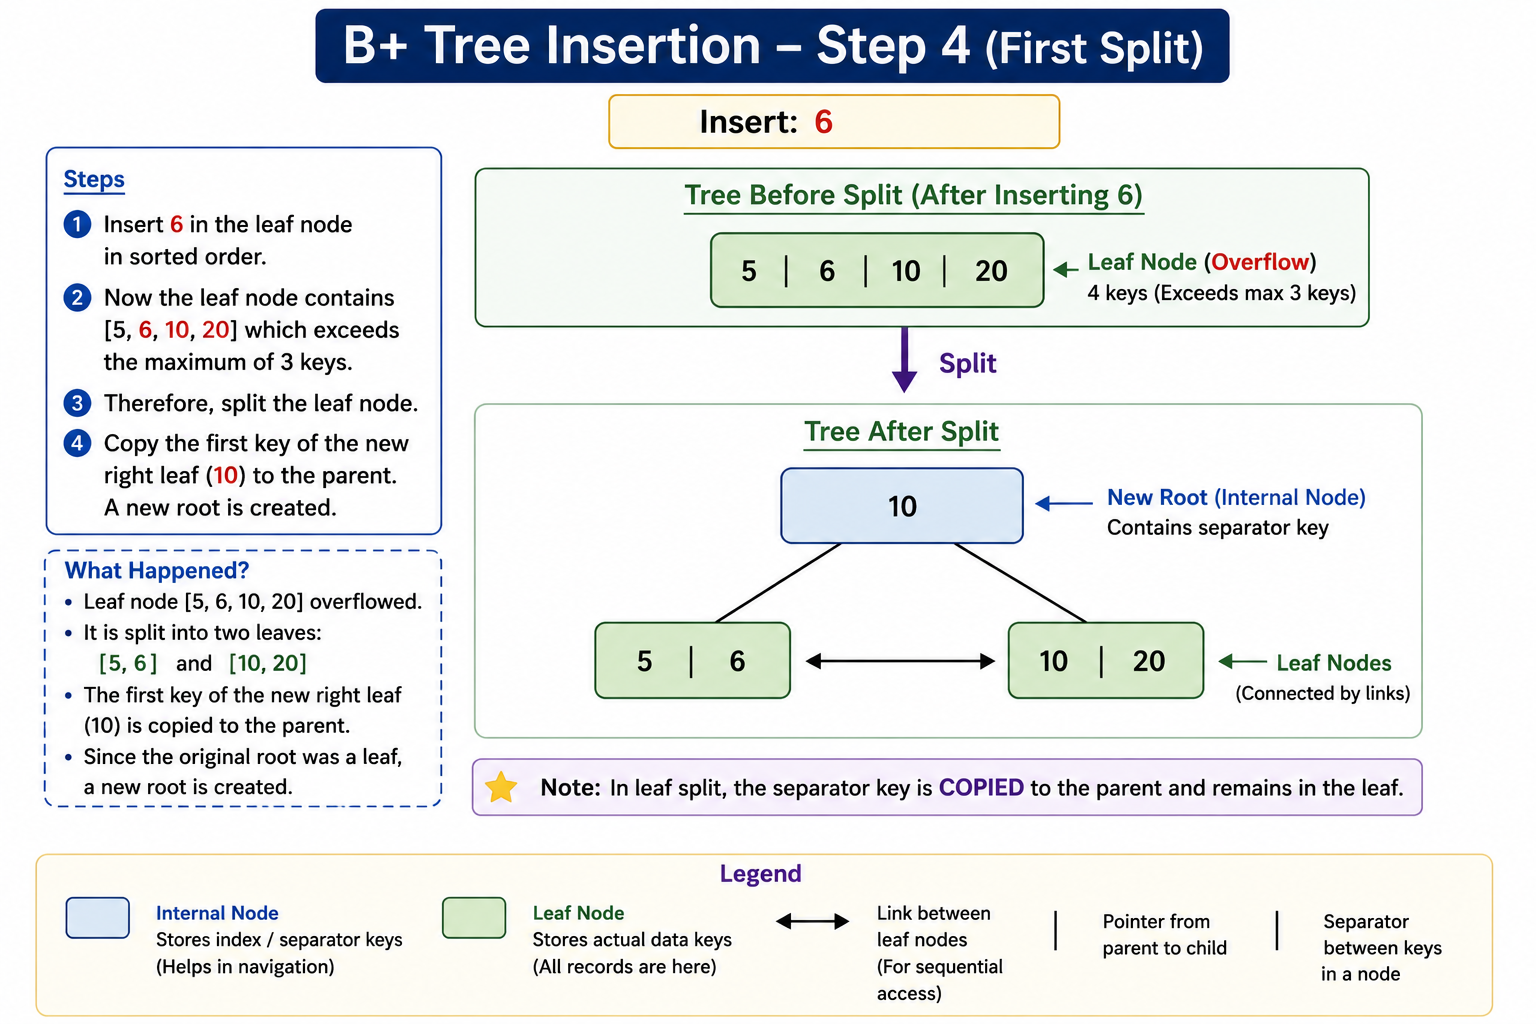
Figure 3: First leaf-node split
The two leaf nodes are linked. Therefore, we can move from the first leaf to the second leaf.
Understanding the First Split
Let us stop here for a moment because this is one of the most important concepts in B+ Tree insertion.
| Before Split | After Split |
|---|---|
| [ 5 | 6 | 10 | 20 ] | [ 5 | 6 ] → [ 10 | 20 ] |
| One leaf node | Two leaf nodes |
| Node is overflowing | Overflow is removed |
| No parent index | 10 becomes separator in parent |
This is the basic idea that we will use throughout insertion.
Step 5: Insert 12
Now insert:
We start from the root. The root contains the separator:
Since 12 is greater than 10, we move to the right leaf node.
The keys remain sorted. The leaf still contains only three keys, so there is no overflow.
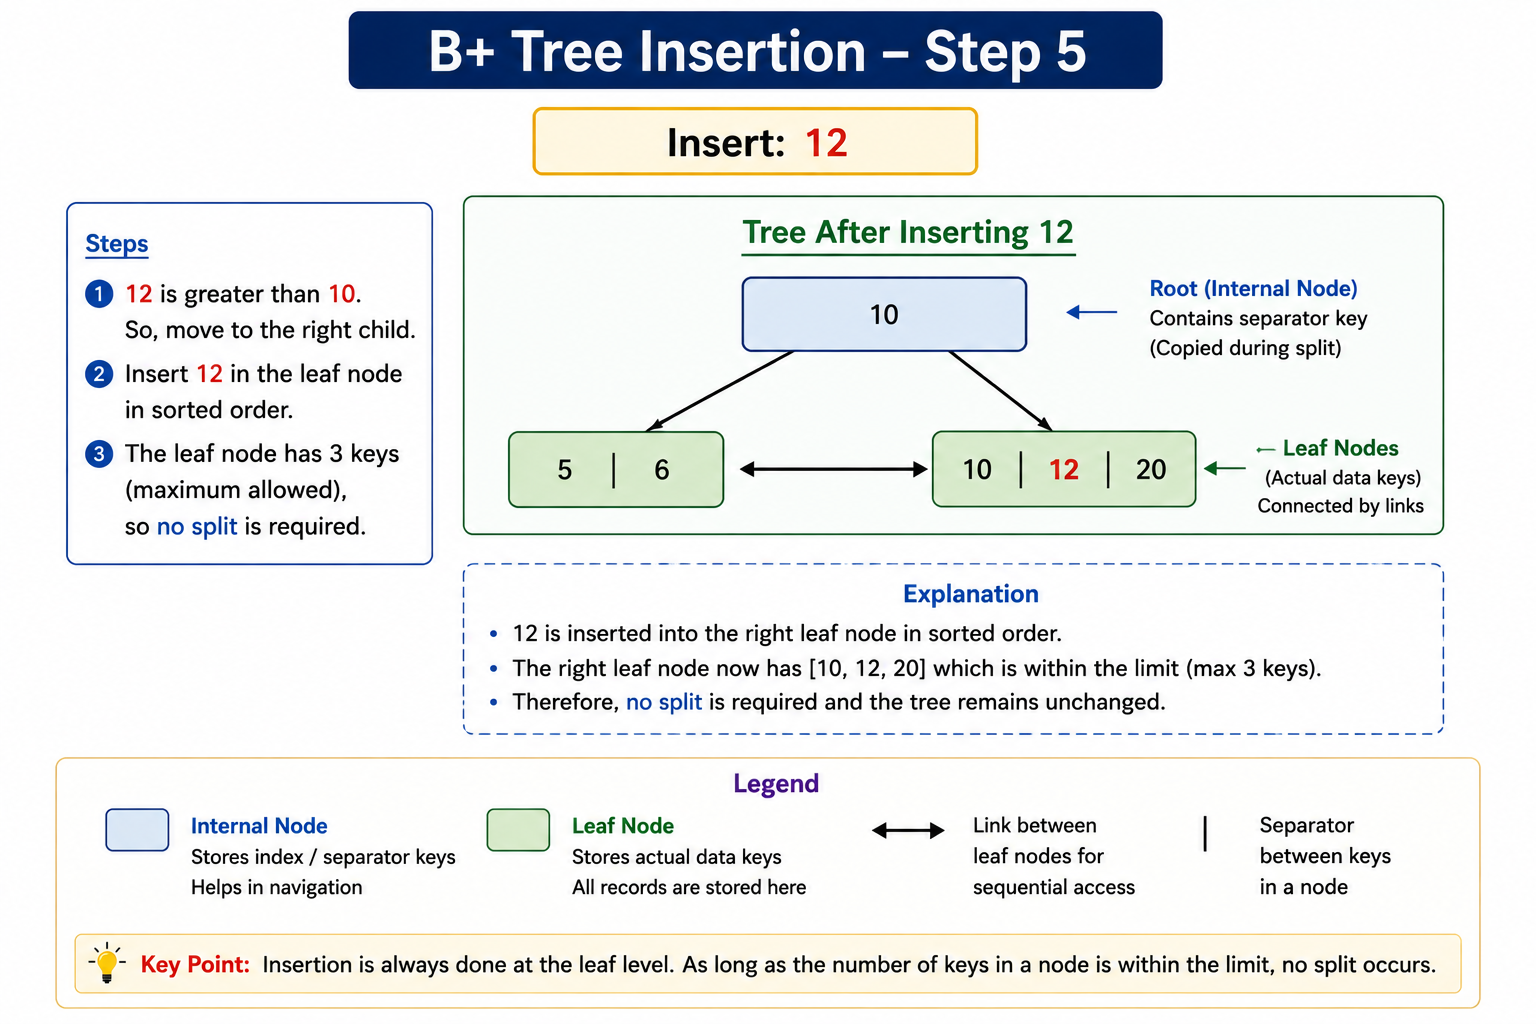
Figure 4: B+ Tree after inserting 12
Step 6: Insert 30
Now insert:
Again, start from the root. Since 30 is greater than 10, move to the right leaf. The leaf currently contains:
Insert 30:
The leaf now contains four keys. Therefore, it overflows and must be split.
Split the Leaf
Divide the leaf into two nodes:
The first key of the second leaf is 20. Therefore, 20 is copied to the parent.
The root previously contained:
After inserting the new separator:
The complete tree becomes:
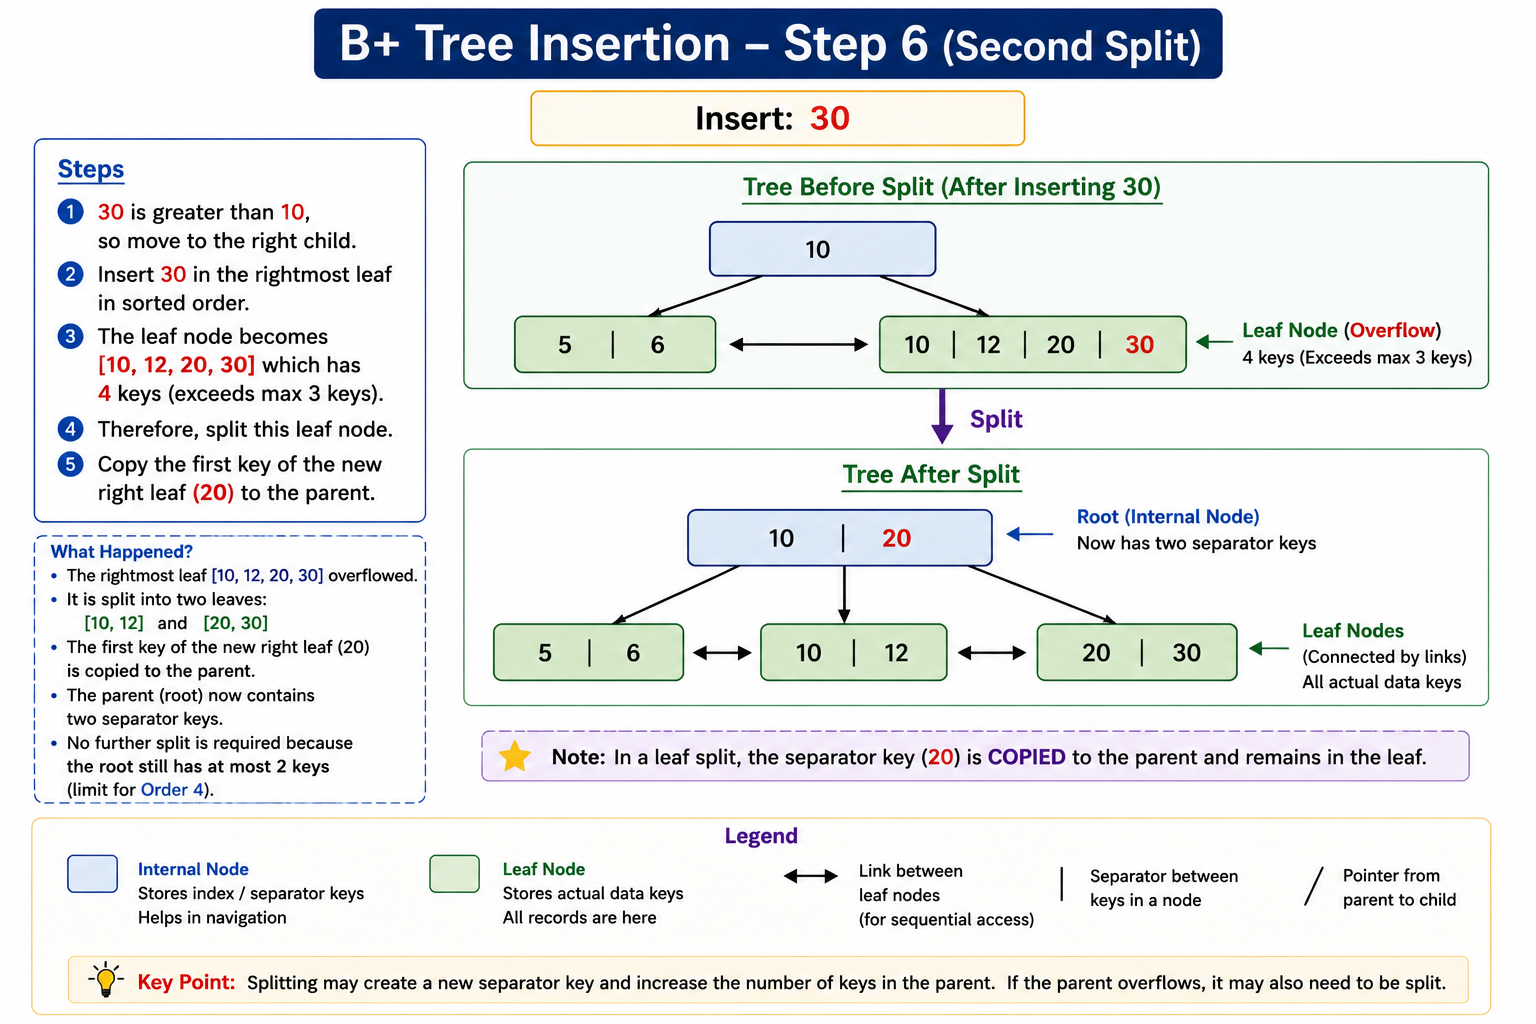
Figure 5: Second leaf-node split
Step 7: Insert 7
Now insert:
Start from the root:
Since 7 is smaller than 10, we move to the first leaf. The first leaf currently contains:
Insert 7:
There are three keys, so there is no overflow.
Step 8: Insert 17
Finally, insert:
Start from the root:
17 is greater than 10 but smaller than 20. Therefore, we move to the middle leaf.
Insert 17:
The leaf contains three keys. Therefore, no splitting is required.
Final B+ Tree
After inserting all the keys:
the final B+ Tree is:
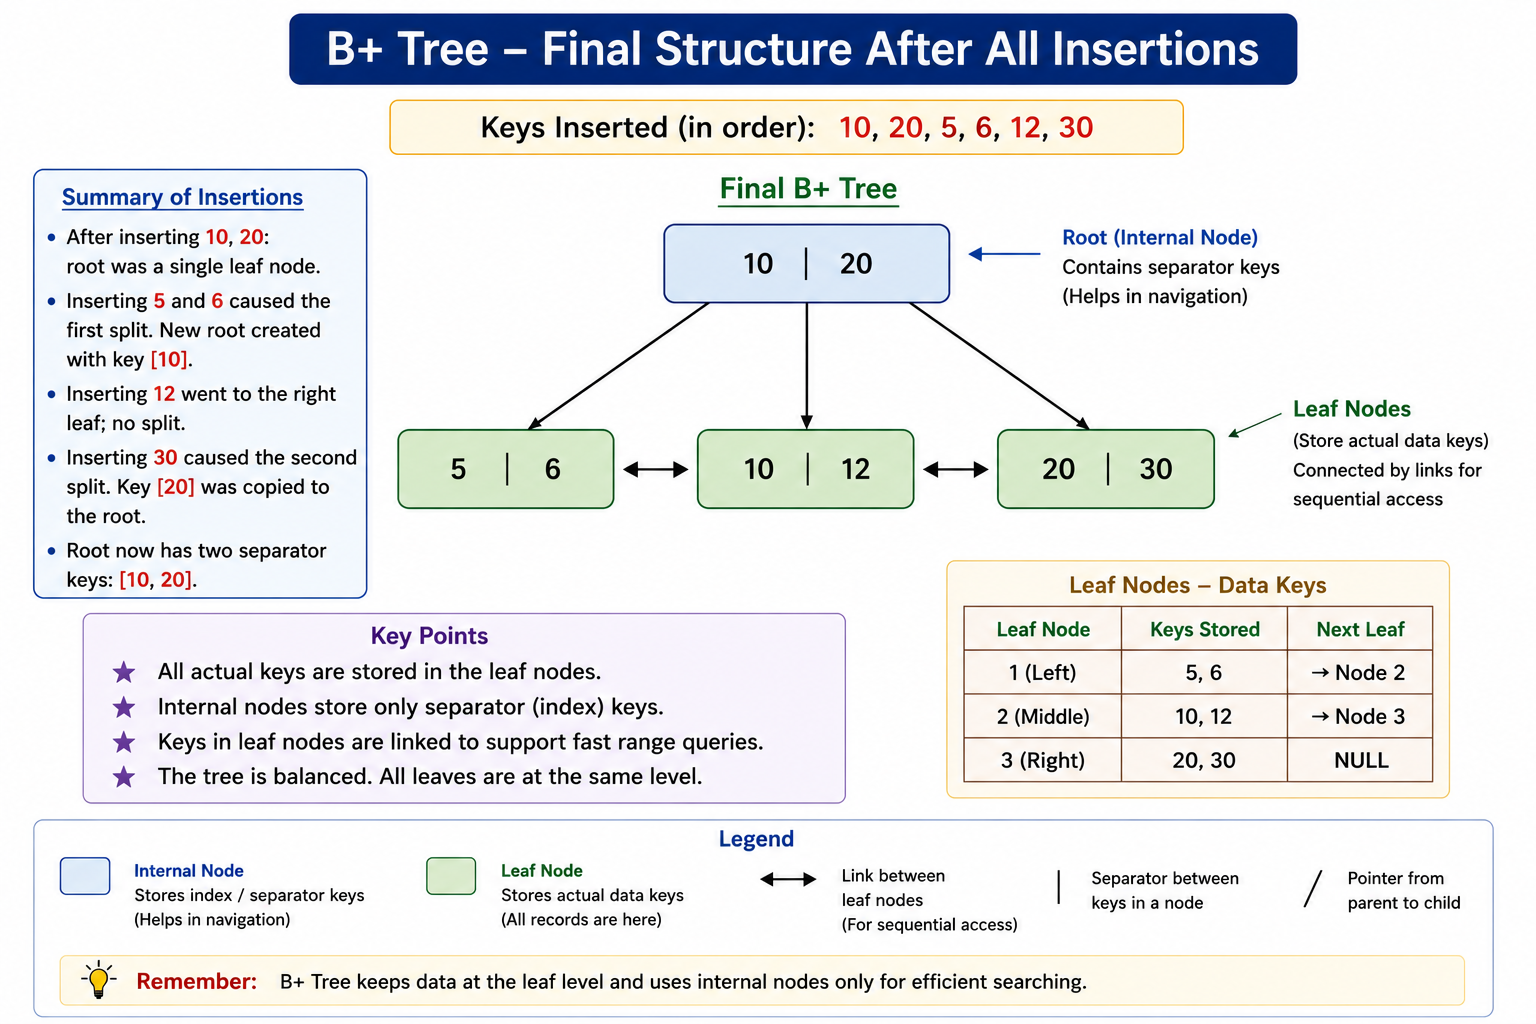
Notice three important things:
- The keys in every leaf are in sorted order.
- All leaf nodes are at the same level.
- All leaf nodes are connected using links.
Complete Insertion Table
The entire insertion process can be summarized as follows:
| Step | Inserted Key | Leaf Nodes | Action |
|---|---|---|---|
| 1 | 10 | [10] | Insert directly |
| 2 | 20 | [10 | 20] | Insert directly |
| 3 | 5 | [5 | 10 | 20] | Insert directly |
| 4 | 6 | [5 | 6] → [10 | 20] | Split leaf |
| 5 | 12 | [5 | 6] → [10 | 12 | 20] | Insert directly |
| 6 | 30 | [5 | 6] → [10 | 12] → [20 | 30] | Split leaf |
| 7 | 7 | [5 | 6 | 7] → [10 | 12] → [20 | 30] | Insert directly |
| 8 | 17 | [5 | 6 | 7] → [10 | 12 | 17] → [20 | 30] | Insert directly |
What Happened During Insertion?
The most important event in this example was the splitting of a leaf node.
Whenever a leaf node became too large:
Important Difference: B+ Tree vs B-Tree Splitting
Students often make a mistake during B+ Tree insertion. In a B-Tree, a key may move from a child node to the parent. In a B+ Tree, when a leaf node is split, the separator key is copied to the parent while the key remains in the leaf.
Insertion Algorithm
Insert(Key)
Step 1 : Start from the root.
Step 2 : Follow the index keys to find the correct leaf node.
Step 3 : Insert the key into the leaf in sorted order.
Step 4 : If the leaf has enough space,
Stop.
Step 5 : If the leaf overflows,
Split the leaf into two nodes.
Step 6 : Copy the first key of the right leaf
to the parent as a separator.
Step 7 : Connect the two leaf nodes.
Step 8 : If the parent overflows,
Split the internal node.
Step 9 : Continue upwards if required.
Step 10 : If the root splits,
create a new root.
Key Points from This Example
- Insertion always begins from the root.
- We follow the index keys to find the correct leaf.
- The new key is inserted in sorted order.
- If there is enough space, no split is required.
- If the leaf overflows, it is divided into two leaves.
- A separator key is copied to the parent.
- The separator key remains in the leaf.
- The leaf nodes are connected using links.
- If an internal node also overflows, it may have to be split.
- If the root splits, a new root is created.
Next: Internal Node Splitting
In our example, we have seen how a leaf node is split. But what happens when the parent/internal node itself becomes full?
This is a very important part of B+ Tree insertion. In the next section, we will understand:
- How an internal node overflows
- How an internal node is split
- Which key moves to the parent
- How a new root is created
- A complete example of cascading splits
Internal Node Splitting in a B+ Tree
In the previous section, we learned how a leaf node is split when it becomes full. But there is another important situation. What happens if the internal node also becomes full?
An internal node can also overflow. When this happens, the internal node must be split.
When Does an Internal Node Overflow?
In our Order 4 B+ Tree:
- A node can have a maximum of 4 children.
- Therefore, an internal node can contain a maximum of 3 separator keys.
Suppose an internal node already contains:
This node is already full. Now suppose another separator key, 40, needs to be inserted into this node. The temporary node becomes:
There are now four keys. But our Order 4 tree allows a maximum of three keys in an internal node. Therefore, the internal node has overflowed.
What Do We Do During Internal Node Overflow?
We cannot leave four keys in the internal node. Therefore, we split the internal node.
Suppose the temporary keys are:
We select a separator key and divide the node into two parts. For this example, let us use 20 as the key promoted to the parent.
The key 20 is promoted to the parent. Unlike a leaf split, the promoted separator from an internal-node split is not retained in the same internal node.
Leaf Split vs Internal Node Split
This difference is extremely important.
| Leaf Node Split | Internal Node Split |
|---|---|
| Leaf is divided into two leaves. | Internal node is divided into two internal nodes. |
| Separator is copied to parent. | Separator is promoted to parent. |
| The separator remains in the leaf. | The promoted separator does not remain in the split internal node. |
| Leaf nodes remain linked. | Child pointers are redistributed between the new internal nodes. |
Complete Example of Internal Node Splitting
Let us understand this using a larger example. Suppose a B+ Tree currently looks like this:
The root already contains three separator keys. Therefore, it is full.
Now suppose an insertion causes a new separator key 40 to be inserted into the root. The root temporarily becomes:
This is an overflow. The root must therefore be split.
Root Splitting
When the root node itself overflows, the solution is slightly different. We create a new root node.
For example:
Suppose 20 is promoted. The old root is divided into two internal nodes:
Now create a new root containing the promoted key:
The height of the tree has increased by one level.
Why Is a New Root Created?
The root is special because it does not have a parent. If any other internal node overflows, we can send a separator key to its parent. But the root has no parent. Therefore, when the root splits, we create a new root.
Step-by-Step Root Split
Step 1: Full Root
Suppose the root temporarily contains:
Step 2: Select Separator
Select the separator key that will be promoted. For this example:
Step 3: Split the Root
The remaining keys are divided between two internal nodes.
Step 4: Create New Root
Create a new root containing 20.
Step 5: Connect the Children
The child pointers that previously belonged to the old root are distributed between the two new internal nodes.
Visual Representation of Root Splitting
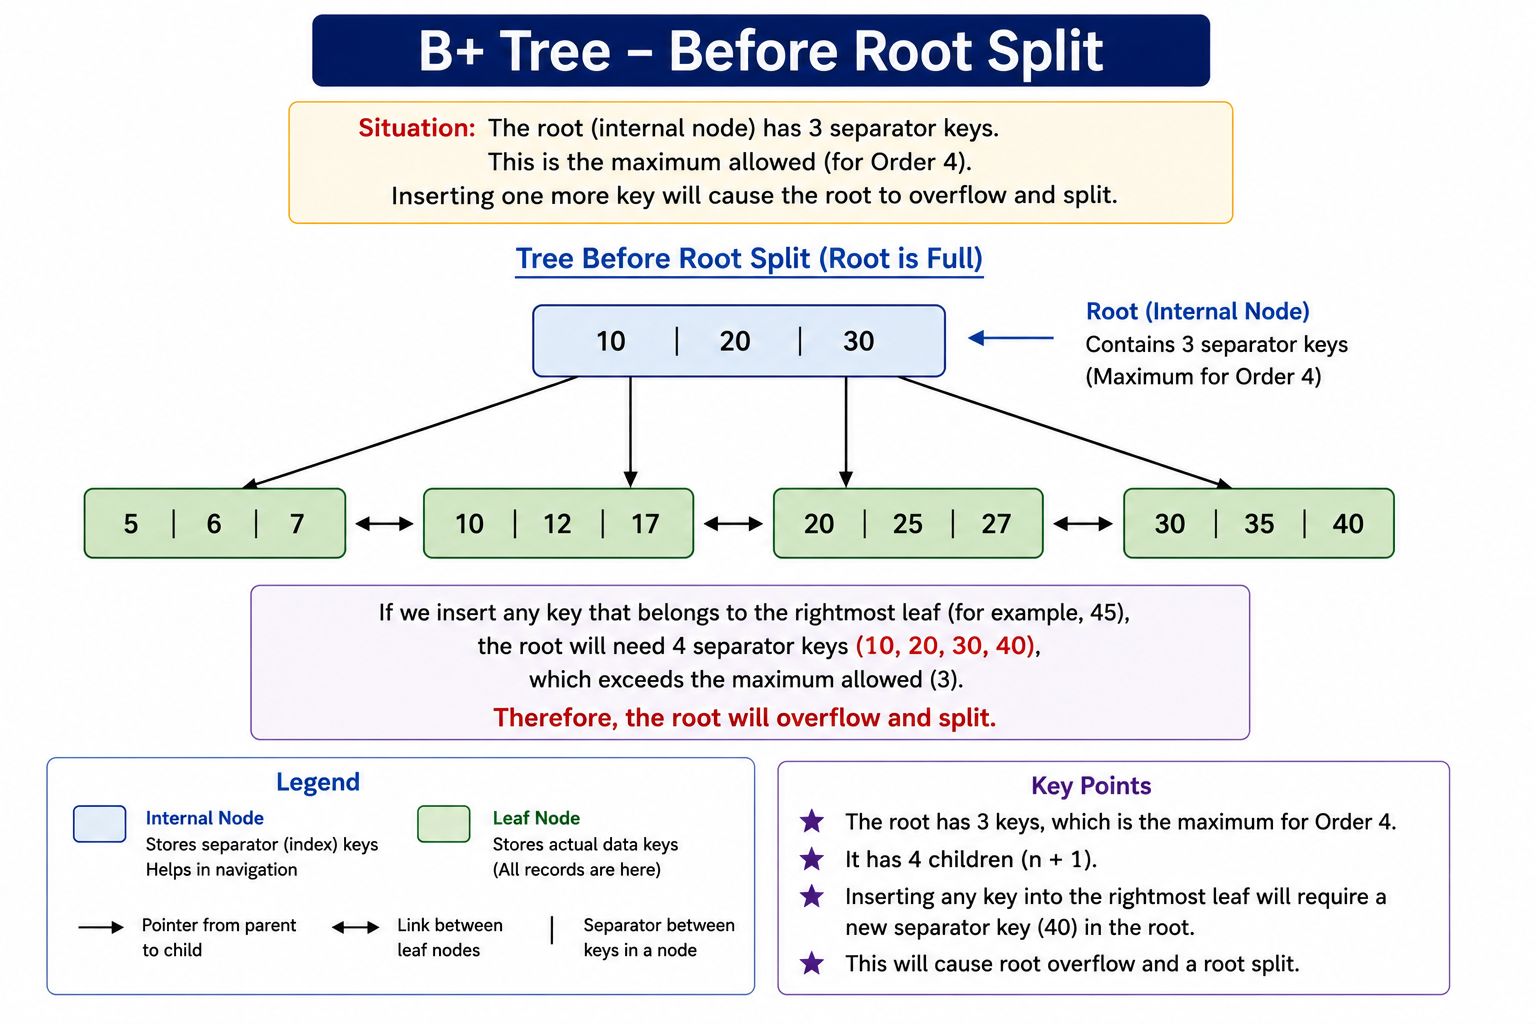
Figure 6: Root before splitting
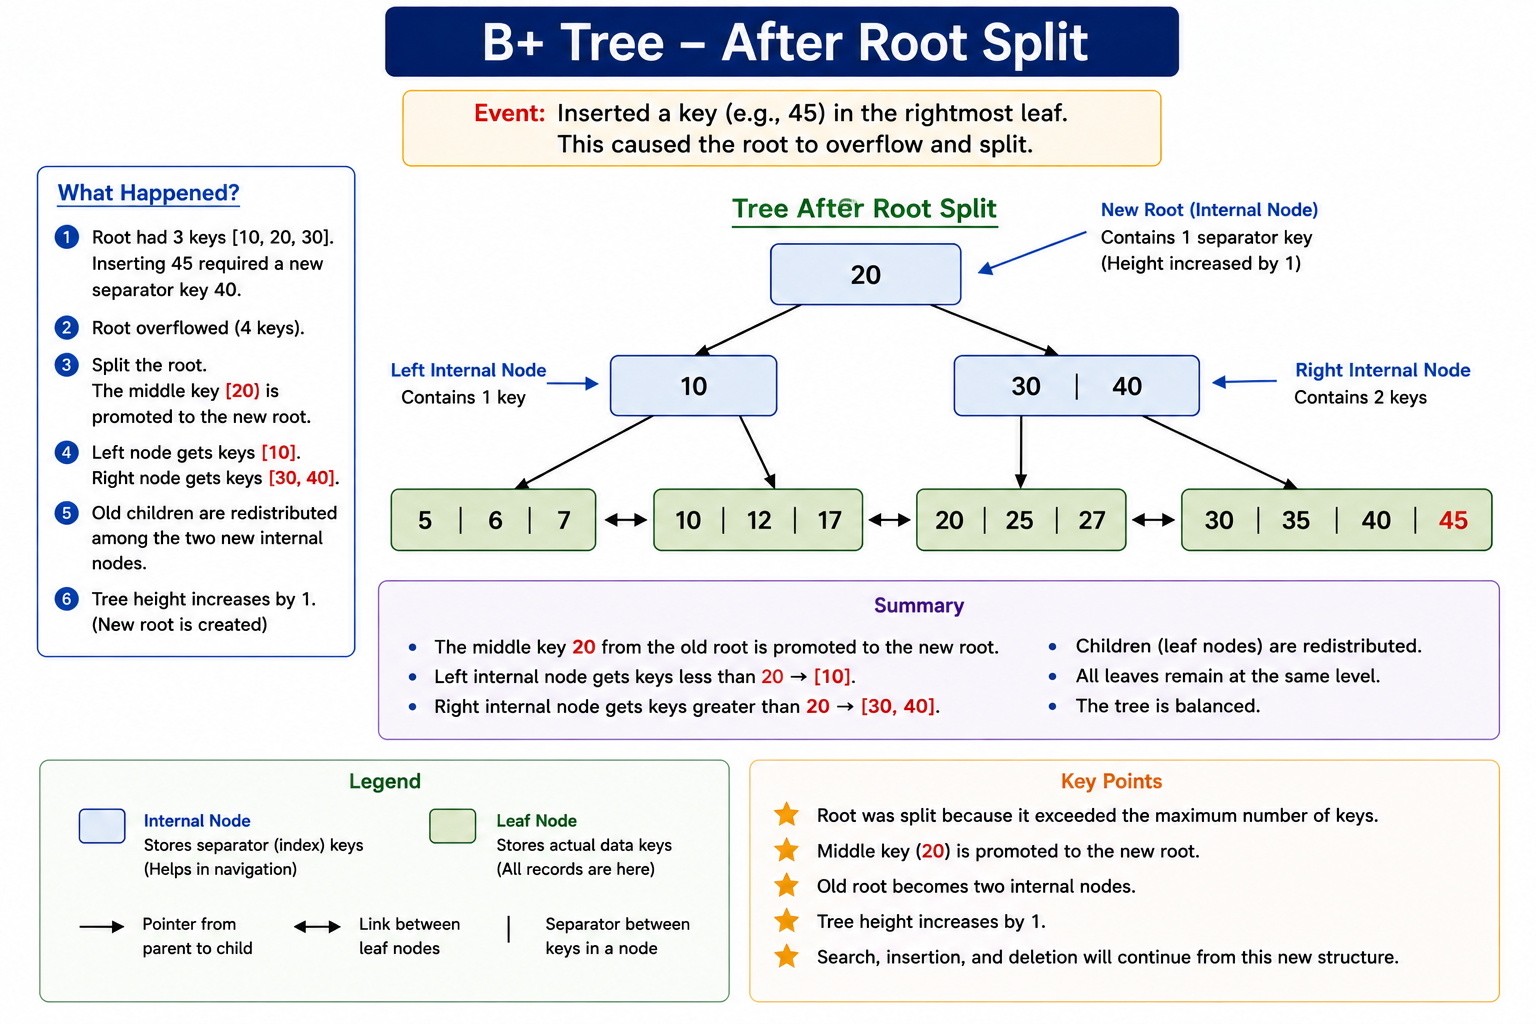
Figure 7: Root after splitting
Cascading Splits
Sometimes splitting does not stop at the leaf. A leaf may split, causing a separator to be inserted into its parent. If that parent is already full, the parent also splits. The process can continue towards the root.
This is called a cascading split.
Complete Cascading Split Example
Consider the following simplified tree:
The root is already full. Now suppose a key is inserted into one of the leaves. The leaf may overflow.
The leaf is split and a new separator is added to the root. The root then temporarily contains four separator keys.
The root has now overflowed. Therefore, it must be split.
A new root is created.
The tree has now gained one additional level.
Important Observation About Tree Height
A B+ Tree grows mainly from the bottom upward. This is different from some ordinary tree structures where we may think of adding new levels from the top.
When a leaf splits, the change may propagate upward. Only when the root splits does the height of the tree increase.
Insertion with Internal Splitting
The complete insertion process can therefore be written as follows:
Insert(Key)
Step 1 : Start from the root.
Step 2 : Follow the index keys.
Step 3 : Reach the correct leaf node.
Step 4 : Insert the key in sorted order.
Step 5 : Check whether the leaf has overflowed.
Step 6 : If there is no overflow,
Stop.
Step 7 : If the leaf overflows,
split the leaf.
Step 8 : Copy the separator key
to the parent.
Step 9 : Check whether the parent has overflowed.
Step 10 : If the parent has not overflowed,
Stop.
Step 11 : If the parent overflows,
split the internal node.
Step 12 : Promote the separator key
to its parent.
Step 13 : Continue checking upwards.
Step 14 : If the root overflows,
split the root.
Step 15 : Create a new root.
Step 16 : The insertion is complete.
Leaf Split and Internal Split — Quick Revision
| Situation | Action |
|---|---|
| Leaf has space | Insert the key directly. |
| Leaf overflows | Split the leaf. |
| Leaf split creates separator | Copy separator to parent. |
| Parent has space | Insert separator into parent. |
| Parent overflows | Split the internal node. |
| Internal node split | Promote separator to its parent. |
| Root overflows | Create a new root. |
Common Mistakes During B+ Tree Insertion
Students commonly make the following mistakes while solving B+ Tree questions.
Mistake 1: Removing the Separator from the Leaf
During a leaf split, the separator is copied to the parent. It should remain in the leaf.
Mistake 2: Forgetting Leaf Links
After splitting a leaf, the new leaf nodes must remain connected.
Mistake 3: Treating Internal Splitting Like Leaf Splitting
Leaf splitting and internal-node splitting are not exactly the same. In an internal split, the promoted separator moves upward.
Mistake 4: Forgetting the New Root
If the root itself overflows, we cannot send a key to a parent because the root has no parent. Therefore, a new root must be created.
Interview Questions
- What happens when a leaf node overflows?
- What happens when an internal node overflows?
- What is a cascading split?
- When does the height of a B+ Tree increase?
- Why is a new root created after root splitting?
- What is the difference between leaf splitting and internal-node splitting?
- Does the separator key remain in the leaf after a leaf split?
Summary of Internal Node Splitting
An internal node is split when it contains more keys than allowed. The node is divided into two internal nodes and a separator key is promoted to the parent. If the parent also overflows, the splitting process continues upward. If the root overflows, a new root is created.
Next Topic: Searching in a B+ Tree
We have now learned how a B+ Tree is created and how insertion works. The next important operation is searching.
In the next section, we will take different search values and follow the path from the root to the correct leaf node step by step. We will also learn how to perform a range search using the linked leaf nodes.
Searching in a B+ Tree
Searching is one of the most important operations performed on a B+ Tree. The main purpose of the B+ Tree is to find the required data quickly, even when the database contains a very large number of records.
In a B+ Tree, searching always starts from the root node. The internal nodes help us decide which child node should be followed. Finally, we reach the appropriate leaf node, where the actual key or record is stored.
Basic Steps of Searching
The basic searching process can be understood in the following steps:
Example B+ Tree for Searching
Let us use the following B+ Tree for our searching examples.
The root contains the index keys:
The actual keys are stored in the leaf nodes.
Searching for 17
Suppose we want to search for:
Step 1: Start at the Root
The root contains:
Now compare 17 with the root keys.
- 17 is greater than 10.
- 17 is smaller than 20.
Therefore, we follow the middle child.
Step 2: Reach the Leaf
The middle leaf contains:
Now search inside the leaf. The key 17 is present.
Searching Path for 17
The complete path is:
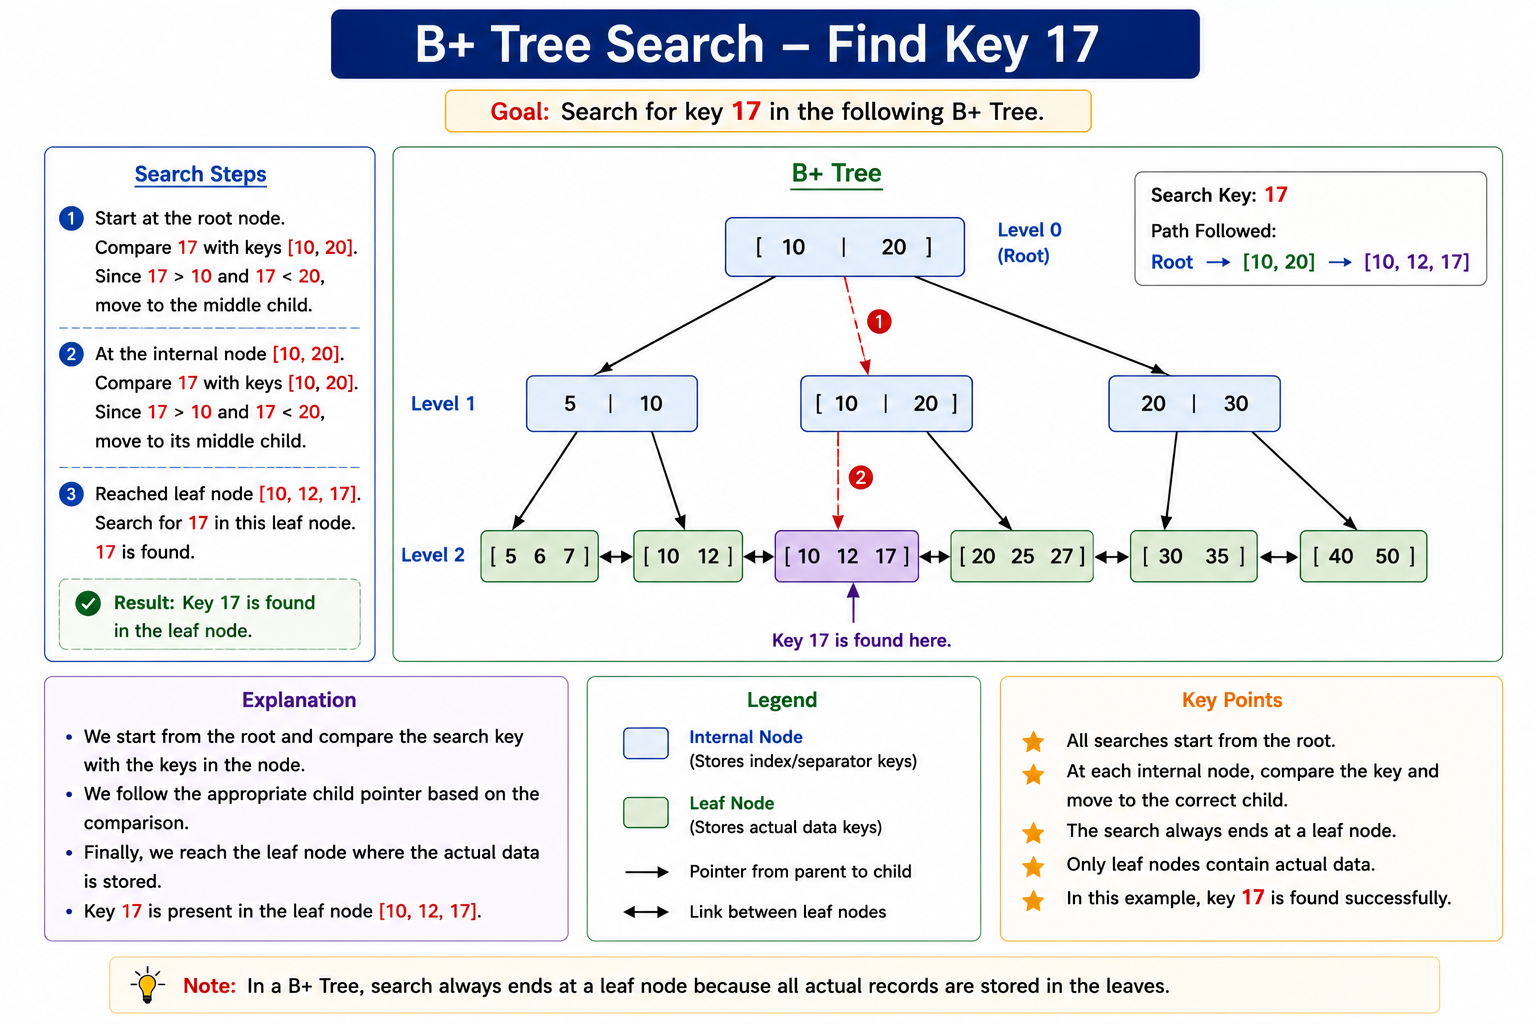
Figure 8: Searching for 17 in a B+ Tree
Searching for 6
Now suppose we want to search for:
Step 1: Start at Root
The root is:
Since 6 is smaller than 10, we move to the left child.
Step 2: Search the Leaf
The left leaf is:
The key 6 is present.
Searching for 30
Now search for:
Compare 30 with the root keys.
- 30 is greater than 10.
- 30 is greater than 20.
Therefore, we follow the rightmost child.
The key 30 is present.
Searching for a Key That Does Not Exist
Now let us search for a key that is not present in the tree. Suppose we search for:
Start from the root:
15 is:
- Greater than 10.
- Smaller than 20.
Therefore, we move to the middle leaf:
Now compare 15 with the keys in the leaf.
- 15 is greater than 12.
- 15 is smaller than 17.
Therefore, 15 is not present.
Searching Example Summary
| Search Key | Leaf Visited | Result |
|---|---|---|
| 6 | [5 | 6 | 7] | Found |
| 10 | [10 | 12 | 17] | Found |
| 17 | [10 | 12 | 17] | Found |
| 20 | [20 | 30] | Found |
| 30 | [20 | 30] | Found |
| 15 | [10 | 12 | 17] | Not Found |
Searching in a Multi-Level B+ Tree
The examples above used a small B+ Tree with only one level of internal nodes. Real databases may contain millions or billions of records. In such cases, the B+ Tree can have several levels.
For example:
The search simply continues from one level to the next until a leaf node is reached.
Example: Searching in a Multi-Level Tree
Suppose we want to search for the key:
Step 1: Check the Root
Suppose the root contains:
75 is greater than 40 but smaller than 80. Therefore, move to the middle child.
Step 2: Check the Internal Node
Suppose the next internal node contains:
75 is greater than both 60 and 70. Therefore, move to the rightmost child.
Step 3: Reach the Leaf
Suppose the leaf contains:
The key 75 is found.
Searching Algorithm
Search(Key)
Step 1 : Start from the root node.
Step 2 : Compare Key with the index keys.
Step 3 : Select the appropriate child.
Step 4 : Repeat Step 2 and Step 3
until a leaf node is reached.
Step 5 : Search for Key in the leaf node.
Step 6 : If Key is present,
return "Found".
Step 7 : Otherwise,
return "Not Found".
Range Searching in a B+ Tree
One of the biggest advantages of a B+ Tree is its ability to perform range queries efficiently.
A range query means that we want to retrieve all keys between two values.
For example:
Instead of searching for every key separately, we can use the linked leaf nodes.
Step 1: Find the Starting Key
First, search for the starting value:
The search takes us to:
We have reached the leaf containing 12. Now we do not need to search from the root again.
Step 2: Follow the Leaf Link
The leaf nodes are linked:
Starting from 12, read the keys sequentially:
We stop when the upper limit of the range is reached.
Range Query Diagram
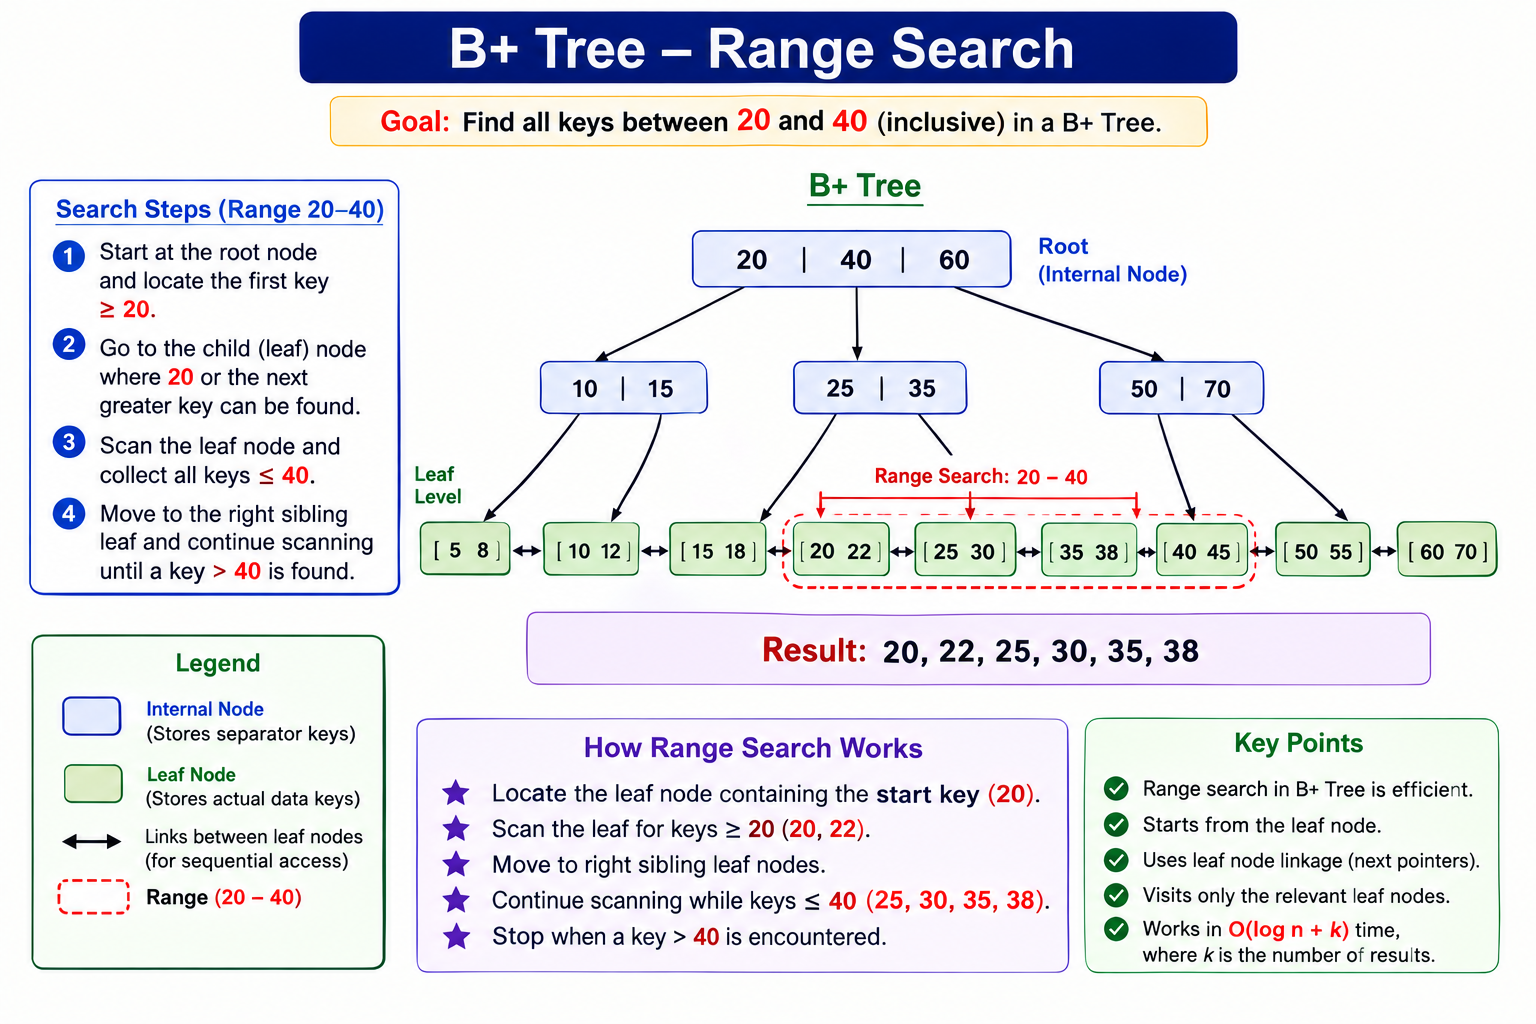
Figure 9: Range Searching using Linked Leaf Nodes
Why Is Range Searching Fast?
Suppose a database contains thousands of records. We want all records between 1000 and 2000.
In a B+ Tree, we first locate 1000 using the normal tree search. Once we reach the appropriate leaf, we simply follow the leaf links.
We do not need to start from the root again for every record. This makes range searching very efficient.
Example of a Range Query
Consider:
Suppose we want all values from 7 to 35.
First, locate 7. Then follow the links:
The range search is complete.
Single Search vs Range Search
| Single-Key Search | Range Search |
|---|---|
| Search for one particular key. | Search for all keys between two values. |
| Starts at root. | Starts at root to locate the first key. |
| Ends after finding the required key. | Continues through linked leaf nodes. |
| Uses index keys for navigation. | Uses index keys plus leaf links. |
Searching Complexity
The height of a balanced B+ Tree is small even when the number of records is very large. Therefore, searching has a time complexity of:
For a range query returning k records, the commonly expressed complexity is:
Here:
- n = total number of records.
- k = number of records returned by the range query.
The O(log n) part represents locating the starting point. The k part represents reading the required records sequentially.
Important Rules for Searching
- Always begin at the root.
- Internal nodes are used for navigation.
- Compare the search key with the index keys.
- Choose the correct child according to the key range.
- Continue until a leaf node is reached.
- Search for the key inside the leaf.
- If the key is not present in the leaf, the search is unsuccessful.
- For range queries, locate the starting key first.
- After reaching the starting leaf, follow the linked leaf nodes.
Interview Questions
- How is searching performed in a B+ Tree?
- Why does searching always reach a leaf node?
- What is the role of internal nodes during searching?
- How do you search for a key that does not exist?
- What is a range query?
- Why are linked leaf nodes useful for range queries?
- What is the time complexity of searching in a B+ Tree?
- What is the complexity of a range query returning k records?
Summary
Searching in a B+ Tree starts at the root. The internal nodes contain index keys that guide the search towards the correct leaf node. Once the leaf node is reached, the required key is searched there.
The linked leaf nodes provide an additional advantage. After locating the first key of a range, we can simply move through the linked leaves to retrieve the remaining records.
Next Topic: Deletion in a B+ Tree
Searching is now complete. The next major operation is deletion. Deletion is slightly more complicated than insertion because removing a key can make a node contain fewer keys than allowed.
We will learn how a B+ Tree handles this situation using:
- Simple deletion
- Deletion from a leaf node
- Borrowing from a sibling
- Updating separator keys
- Merging two leaf nodes
- Internal-node deletion
- Root adjustment
Deletion in a B+ Tree
Deletion means removing a key or record from a B+ Tree. At first, deletion may look simple. We find the required key and remove it from the leaf node. However, sometimes removing a key makes the leaf node contain fewer keys than the minimum allowed number of keys. This situation is called underflow.
To handle underflow, a B+ Tree can use two important techniques:
- Borrowing a key from a neighbouring sibling.
- Merging the node with a neighbouring sibling.
The purpose of these operations is to keep the B+ Tree balanced.
Basic Idea of Deletion
The basic deletion process is:
Example B+ Tree for Deletion
Let us use the following B+ Tree for our deletion examples:
All actual keys are stored in the leaf nodes. The root contains the separator keys 10 and 20.
Case 1: Simple Deletion
Let us first delete a key without causing underflow. Suppose we want to delete:
Step 1: Find the Key
Start from the root:
17 is greater than 10 but smaller than 20. Therefore, we move to the middle leaf.
Step 2: Delete 17
Remove 17 from the leaf:
The leaf still contains enough keys. Therefore, no borrowing or merging is required.
The tree becomes:
What Is Underflow?
Underflow occurs when a node contains fewer keys than the minimum number allowed after deletion.
For our examples, we will use the following simple rule:
Therefore, if a leaf contains two keys and we delete one of them, it may become:
This leaf now has only one key. Therefore, it has an underflow.
How Is Underflow Handled?
When underflow occurs, the B+ Tree normally tries the following:
The sibling is a neighbouring node at the same level.
Case 2: Deletion Causing Underflow
Consider the following tree:
Suppose we delete 6.
Step 1: Locate 6
The root is:
Since 6 is smaller than 10, move to the left leaf:
Step 2: Delete 6
After deleting 6:
The leaf contains only one key. According to our example rules, this causes underflow.
Case 3: Borrowing from a Sibling
The first thing we should check is whether a neighbouring sibling has an extra key that can be borrowed.
Our tree is:
The middle leaf has two keys. It can provide a key to the left leaf.
The middle leaf contains:
We can borrow the smallest suitable key from the right sibling. The result becomes:
The parent separator must also be updated because the first key of the middle leaf has changed.
The exact separator update depends on the key distribution and the convention being used. The important idea is:
A Clearer Borrowing Example
Let us use a simpler example to understand borrowing. Suppose two neighbouring leaves are:
The left leaf has an underflow. The right sibling has an extra key. Therefore, we can redistribute the keys.
Move the smallest suitable key from the right sibling to the left sibling:
Now both leaves contain enough keys. The underflow has been removed.
Why Must the Parent Separator Be Updated?
The parent contains index keys that tell us which leaf should be searched. If the first key of a leaf changes because of borrowing, the corresponding separator in the parent may also need to change.
For example:
After redistribution:
The parent index must correctly represent the boundary between the two children.
Case 4: Merging Leaf Nodes
What happens if a node has underflow and its neighbouring sibling does not have an extra key to lend?
In that situation, we may need to merge the two leaf nodes.
Consider:
Suppose both nodes contain only the minimum number of keys. If we delete 5:
The first leaf is now empty. There is no extra key available to borrow. Therefore, the two leaves can be merged.
The unused leaf node is removed from the tree. The corresponding separator key in the parent must also be removed or adjusted.
Step-by-Step Leaf Merging
Before Deletion
Delete 6
The left leaf has an underflow. Suppose the right leaf cannot lend a key. Therefore, merge the nodes.
After Merge
The two leaves have become one leaf. The parent must now be updated because one child has disappeared.
Leaf Links After Merging
When two leaf nodes are merged, the linked-leaf structure must also be maintained.
Before merging:
Suppose L1 and L2 are merged. After merging:
The leaf links must continue to allow sequential traversal from left to right.
Borrowing vs Merging
| Borrowing | Merging |
|---|---|
| Used when a sibling has an extra key. | Used when a sibling cannot lend a key. |
| Keys are redistributed. | Two nodes are combined. |
| Both nodes remain. | One node is removed. |
| Parent separator may need updating. | Parent separator is removed or adjusted. |
| Usually preferred when possible. | May cause an underflow in the parent. |
Deletion from the Root
The root node is a special case. A root is allowed to have fewer keys than ordinary nodes. Therefore, we do not apply the same minimum-key rule to the root in exactly the same way.
Suppose the tree contains only one leaf node:
If we delete 10:
The tree is still valid.
If we delete 20 as well:
The tree becomes empty.
Root Adjustment After Merging
Sometimes deletion and merging can make the root contain no useful separator keys. In that situation, the only remaining child can become the new root.
For example:
If the two children are merged, we may obtain:
The old root is no longer required. The remaining node becomes the new root.
Deletion Can Reduce Tree Height
During insertion:
During deletion:
This is an important concept to remember.
Complete Deletion Process
Deletion Algorithm
Delete(Key)
Step 1 : Start from the root.
Step 2 : Follow the index keys.
Step 3 : Reach the leaf containing Key.
Step 4 : Delete Key from the leaf.
Step 5 : Check whether the leaf has
the minimum required number of keys.
Step 6 : If there is no underflow,
update the required separator
keys if necessary.
Step 7 : If underflow occurs,
check the neighbouring sibling.
Step 8 : If the sibling has an extra key,
borrow a key.
Step 9 : Redistribute the keys.
Step 10 : Update the parent separator.
Step 11 : If borrowing is not possible,
merge the node with a sibling.
Step 12 : Remove or update the corresponding
separator in the parent.
Step 13 : Check whether the parent
has underflowed.
Step 14 : If required, continue the
borrowing or merging process upward.
Step 15 : If the root becomes empty
and has one remaining child,
make that child the new root.
Step 16 : Deletion is complete.
Important Difference Between Insertion and Deletion
| Insertion | Deletion |
|---|---|
| Starts by adding a key. | Starts by removing a key. |
| Overflow is possible. | Underflow is possible. |
| Overflow is handled by splitting. | Underflow is handled by borrowing or merging. |
| Root split may increase tree height. | Root collapse may decrease tree height. |
| Leaf split creates a new leaf. | Leaf merge removes a leaf. |
Common Mistakes During Deletion
Mistake 1: Deleting Only from the Parent
The actual data key must be removed from the appropriate leaf node. The parent contains index information.
Mistake 2: Ignoring Underflow
After deletion, always check whether the node still satisfies the minimum occupancy requirement.
Mistake 3: Forgetting Borrowing
If a neighbouring sibling has an extra key, redistribution may solve the underflow without merging.
Mistake 4: Forgetting Parent Updates
Borrowing or merging can change the boundary between child nodes. Therefore, parent separator keys may need to be updated.
Mistake 5: Forgetting Leaf Links
After merging leaf nodes, the linked-leaf chain must still work correctly.
Mistake 6: Forgetting Root Adjustment
If deletion causes the root to become unnecessary, the remaining child may become the new root.
Quick Example: Borrow or Merge?
| Situation | Action |
|---|---|
| Delete key and node remains valid | Simple deletion |
| Node underflows and sibling has extra key | Borrow from sibling |
| Node underflows and sibling cannot lend | Merge with sibling |
| Parent becomes deficient after merge | Continue adjustment upward |
| Root becomes empty with one child | Make child the new root |
Complexity of Deletion
A B+ Tree remains balanced after deletion. Therefore, the height of the tree remains logarithmic with respect to the number of records. The time complexity of deletion is generally:
The search for the key takes logarithmic time. Borrowing, merging and updating nodes involve only a small number of nodes along the path from the leaf towards the root.
Interview Questions
- What is deletion in a B+ Tree?
- What is underflow?
- How is underflow handled?
- What is borrowing in a B+ Tree?
- What is merging in a B+ Tree?
- When do we merge two leaf nodes?
- Why must parent separator keys sometimes be updated?
- What happens when the root becomes empty?
- Can deletion reduce the height of a B+ Tree?
- What is the time complexity of deletion?
Summary
Deletion in a B+ Tree starts by locating the required key in a leaf node. After deleting the key, we check whether the leaf still contains the required number of keys. If the node becomes deficient, we first try to borrow a key from a sibling. If borrowing is not possible, the node is merged with a sibling. The parent is then updated, and the same process may continue upward.
Next Topic: Complete B+ Tree Deletion Example
We have now learned the individual concepts involved in deletion. In the next section, we will solve a complete deletion problem from beginning to end.
We will delete several keys and draw the B+ Tree after every important step. The example will demonstrate:
- Simple deletion
- Underflow
- Borrowing
- Leaf merging
- Parent adjustment
- Root adjustment